Archive
Copy a File’s Path to the Clipboard
Copy a File’s Path to the Clipboard without any Registry Hacks !
If you ever wanted to copy the full path of any file or folder to the clipboard but without installing any third-party utilities or making any changes to your Windows registry, here’s a tip for you.
Copy the File’s Location to the Clipboard
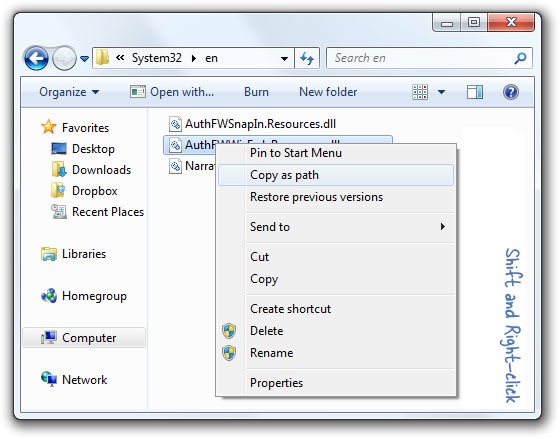
Open Windows Explorer and navigate to the file or folder whose path you want to copy to the clipboard. Once you are there, hold the “Shift” key and right click that file or folder’s icon.
Because the Shift key is down, the contextual menu will have a new item that says “Copy as Path” – select that and the full location of the file or the folder will get saved to your clipboard from where you can paste it anywhere including the DOS window.
You can use this tip to copy a file’s location from all places including those appearing in the desktop search results.
This trick works in Windows Vista and Windows 7 but not XP.
~
SpeedUp Folder Browsing
SpeedUp Folder Browsing !
You may have noticed that everytime you open my computer to browse folders that there is a slight delay.
This is because Windows XP automatically searches for network files and printers everytime you open Windows Explorer.
To fix this and to increase browsing significantly:
1. Open My Computer
2. Click on Tools menu
3. Click on Folder Options
4. Click on the View tab.
5. Uncheck the Automatically search for network folders and printers check box
6. Click Apply
7. Click Ok
8. Reboot.
~
Make a photo background in drives
Make a photo background in drives
1. Open notepad and copy the following code:
| [{BE098140-A513-11D0-A3A4-00C04FD706EC}] iconarea_image=D:\htmlfiles\wp\header.jpg iconarea_text=0x00FFFFFF |
2. Here, the path in the 2nd line of code represents the path of the Image.
3. Now save this file as DESKTOP.INI in the location(any drive or any folder) where you desire to set the background picture.
4. After setting it in your favourite location,close the drive and open the location again.
Note: Make sure that the extension in the path should be .jpg only and file should be saved as DESKTOP.INI only.
~
Change ‘My Pictures’ Folder path
Change ‘My Pictures’ folder path
This also works for “My Music” Folder
The folders you are referring to are called Shell Folders.
–> Navigate to HKEY_CURRENT_USER\Software\Microsoft\ Windows\CurrentVersion\Explorer\User Shell Folders
Then choose My Pictures:
–> Double click the “My Pictures” registry entry & enter new path you desire.
say “D:\honey\pics”
–> Reboot
~
Restore missing "Compressed (zipped) Folder" option to the Send To menu
Restore missing “Compressed (zipped) Folder” option to the Send To menu
Windows XP
To restore the missing Compressed (zipped) Folder entry to the “Send To” menu in Windows XP, use these steps:
Click Start, Run and type:
rundll32 zipfldr.dll,RegisterSendto
In the background, a 0 byte file named Compressed (zipped) Folder.ZFSendToTarget will automatically be created in the %Userprofile%\SendTo folder.
Windows Vista
The Compressed (zipped) Folder icon is present in each user profile and also in the Default user profile. Follow these steps to restore the icon to your user account:
1. Click Start, type the following and press Enter:
%systemdrive%\Users\Default\AppData\Roaming\Microsoft\Windows\SendTo
2. Right-click Compressed (zipped) Folder and choose Copy
3. Open the SendTo folder of your user profile. To do so, click Start, type the following and press Enter:
shell:sendto
4. Right-click an empty area in the folder, and choose Paste
~
"Open Containing Folder" Error
“Open Containing Folder” in Search for Files and Folders does not work
When you perform a file search, and then click the Open Containing Folder in the context menu of the Search Results window, instead of opening the parent folder of the selected file, the Open With dialog may pop up, asking you to choose a program.
To resolve the problem, use these steps:
Navigate to HKEY_CLASSES_ROOT\Directory\shell
In the right-pane, double-click the (default) entry
Type the word none and press Enter
Close Regedit.exe
Reboot
~
Add ‘Defragment’ to context menu for a Drive
Add ‘Defragment’ to context menu for aDrive
Navigate to HKEY_CLASSES_ROOT\Drive\shell
Once you reach to shell, create a new key named runas with the default value to Defragment.
Now right-click on defragnow and create a new subkey called command.
Double-Click the Default entry on the left side again and enter the following value: defrag.exe %1 -v
You can alternately choose from one of the other defrag switches here if you’d like.That is it. Close the registry and get back to desktop.Now test it by right clicking a drive defrag option appears or not. If it is there,click on it, and see a new window should appear and the defragmentation should automatically start.
while browsing the Key HKEY_CLASSES_ROOT\Drive\shell, If the shell key is missing create it by right-clicking on Drive and selecting NEW, KEY and enter the name shell. Create a subkey the same way naming it defragnow and follow the rest of the steps.
~
Unable to rotate images in thumbnail or filmstrip view
Unable to rotate images in thumbnail or filmstrip view
When you open a pictures folder (in thumbnail or in filmstrip view), one of the following behavior may occur when you select the Rotate Clockwise or the Rotate Counter Clockwise context menu items:
* Nothing happens, or
* The image is rotated correctly, but the following warning screen is not displayed prior to rotating the image

This happens if you’ve chosen the In the future, do not show me this dialog box and clicked the Yes / No button earlier. However, there is no option provided by the user interface to revert the setting back.
Here is an undocumented way to fix the problem. Follow the steps below:
Preview a picture using Windows Picture and Fax Viewer. Then press and hold the CTRL key, and then close Windows Picture and Fax Viewer window (by pressing the [X] button in the top right corner). You’ll then see the following message:
Any rotation warnings that you may have suppressed have been reset, and may appear again when you rotate a picture.
Click OK. The Rotate functionality is now restored back.
~
Error Accessing Add or Remove Programs
Error Accessing Add or Remove Programs
When you attempt to open the Add or Remove Programs applet in the Control Panel, the following message may appear:
Add or Remove Programs has been restricted. Please check with your administrator.
This is due to one of the following Policy settings:
1. NoAddRemovePrograms
2. NoControlPanel
If your system is attached to a domain, your network administrator may have disabled the Add or Remove Programs applet. For standalone systems, follow the steps below to unlock the restrictions.
Navigate to the following branches one by one:
HKEY_CURRENT_USER \ Software \ Microsoft \ Windows \ CurrentVersion \ Policies \ Uninstall
HKEY_LOCAL_MACHINE \ Software \ Microsoft \ Windows \ CurrentVersion \ Policies \ Uninstall
Delete the NoAddRemovePrograms value if present in the above locations.
Then, navigate to following locations:
HKEY_CURRENT_USER \ Software \ Microsoft \ Windows \ CurrentVersion \ Policies \ Explorer
HKEY_LOCAL_MACHINE \ Software \ Microsoft \ Windows \ CurrentVersion \ Policies \ Explorer
Delete the NoControlPanel value in the above locations.
Reboot
~
Add/Remove Windows Components Error
Error “Setup library comsetup.dll could not be loaded” while opening Add/Remove Windows Components
When you click the “Add/Remove Windows Components” button in Add or Remove Programs, the following error message is displayed:
Setup library comsetup.dll could not be loaded, or function OcEntry could not be found.
When you press OK, the following error is seen:
The application could not be initialized.
This error occurs if the file comsetup.dll is missing from the C:\Windows\system32\setup folder.
Method 1:
The DllCache folder maintains a copy of comsetup.dll file. So, you can copy the file to the following location:
C:\Windows\System32\setup
Note that the DLLCache folder is located at:
C:\Windows\system32\dllcache
Method 2:
Extract comsetup.dll from Windows XP CD
In the Command Prompt, type the following command:
expand X:\i386\comsetup.dl_ -r c:\windows\system\setup
Where X:\ is your CD-ROM drive letter. The above command assumes Windows is installed in C:\ drive. If not, change the drive letter accordingly.
Reboot
~
