Archive
Copy a File’s Path to the Clipboard
Copy a File’s Path to the Clipboard without any Registry Hacks !
If you ever wanted to copy the full path of any file or folder to the clipboard but without installing any third-party utilities or making any changes to your Windows registry, here’s a tip for you.
Copy the File’s Location to the Clipboard
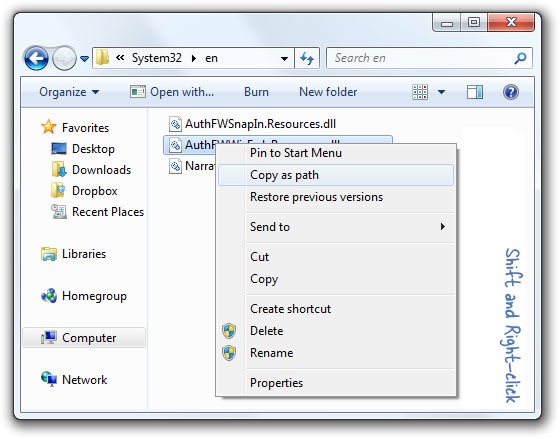
Open Windows Explorer and navigate to the file or folder whose path you want to copy to the clipboard. Once you are there, hold the “Shift” key and right click that file or folder’s icon.
Because the Shift key is down, the contextual menu will have a new item that says “Copy as Path” – select that and the full location of the file or the folder will get saved to your clipboard from where you can paste it anywhere including the DOS window.
You can use this tip to copy a file’s location from all places including those appearing in the desktop search results.
This trick works in Windows Vista and Windows 7 but not XP.
~
Remove Watermark from ‘Windows 7 beta 1’ Desktop
Remove Watermark from ‘Windows 7 beta 1’ Desktop
To remove the watermark you can follow the steps below.
–> Go to Control Panel/User Accounts
–> Change User Account Control Settings and adjust the slider so that it is at the bottom of the screen (Never Notify).
–> Reboot now. After the rebooting browse to the following directory
C:WindowsSystem32en-US
–> Right-click the following file, select the properties. Click on the Security tab and click on the Advanced button at the buttom.
user32.dll.mui
–> In the Advanced Security Settings window click on the Owner tab and click Edit. (By clicking Edit… you have made yourself the owner of the file)
–> Click OK to effect the changes and return to the original file Properties window.
–> Under the security tab, Click Edit.
–>Select Users and a checkmark to the all the checkboxes giving you full control of the file
–> Rename user32.dll.mui to user32-backup.dll.mui
–> Download the patched version of the files – 32 bit Download or 64 bit Download
–> After the files have been downloaded extract it from the original directory
C:WindowsSystem32en-US
–> Reboot
~
Unlock the Windows 7 Hidden Themes
Unlock the Windows 7 Hidden Themes
The Windows 7 beta has a pack of hidden and locked themes. Let’s see how you can unlock the hidden themes.
Step 1: Go to C:\Windows\winsxs
Step 2: Enter *.theme into the search field. Alternately you can use the * sign on the number block.
Step 3: You’ll get the Click me prompt
Step 4: Then, Double-click the themes ZA, US, GB, CA, AU to install them.
Step 5: Reboot after Installation.
~
Remove ‘Send Feedback’ link in Windows 7
Remove Send Feedback link in Windows 7
The bug that troubles the window in Windows 7 is the send feedback link. This is a simple fix to get rid of this pique.
–> Navigate to Key HKEY_CURRENT_USER/Control Panel/Desktop
–> Right-click on the white space in the In the pane to the right of the key hierarchy and select New > DWORD (32 bit) Value.
–> Now as the value appears name it FeedbackToolEnabled
–> Double-click the value that was created with FeedbackToolEnabled and enter 0 in the Value Data box, and then click OK.
–> Reboot
~
Prevent User Installing Gadgets in Windows 7
Prevent User Installing Gadgets in Windows 7
Allow or prevent all users from being able to install a gadget or from adding a user installed gadget to the desktop in Windows 7. By default, user installed gadgets are allowed in Windows 7.
Steps:
1. Open the Local Group Policy Editor.
2. Click on to User Configuration, Administrative Templates, Windows Components, and Desktop Gadgets.
3. Now right click on Turn Off user-installed desktop gadgets and click on Edit.
4. To Allow User to Install Gadgets
* Select (dot) either Not Configured or Disabled.
* Go to step 6.
5. To Prevent User from Install Gadgets
* Select (dot) Enabled.
6. Click OK. And exit the Local Group Policy Editor window.
7. Reboot
~
Enable the Windows Aero in Windows 7
Enable the Windows Aero in Windows 7
If you were looking for the best designed and most transparent Microsoft user interface then you can’t escape Windows Aero. Here’s a hack to enable Windows Aero in Windows 7. But before you proceed with the steps keep a backup of your registry.
–> Navigate to HKEY_CURRENT_USERSoftwareMicrosoftWindowsDWM
–> Look to the pane on the right of the key hierarchy. Right click on the white area and select New > DWORD (32 bit) Value.
–> As the value appears name it UseMachineCheck.
–> Repeat and create 2 more DWORD Values, Blur and Animations
–> First double-click the value just created with the UseMachineCheck and enter 0 in the Value Data box. Do the same for Values Blur and Animations. Then click OK.
–> Now close the Registry Editor.
–> In the Command Prompt, type the following commands
i) Net Stop uxsms – this command will stop the Desktop Windows Manager Session Manager
ii) Net Start uxsms – this command will restart it
–> Close the Command Prompt & Right click on the desktop and click on Personalize from the menu.
–> Click on the Window Color and Appearance in the Personalization Windows Aero the Color Scheme menu.
~
Improve the performance of Windows 7
Improve the performance of Windows 7
Windows will not work on every PC as well. On older PCs to perform new Windows versions often worse. This is partly due to “nice effect’s as shadows.
In this short let me tweak you see where you should go to these things to fit.
Go to Start and type “System Properties Performance”. Enter below.
Go to the tab “Visual Effects”.

Here you will find a list of “Visual Effects” that you can turn on or off. The more functions you off, the better your computer performs reported.’
~
Boost up Windows 7
Speed Up Windows 7 and Windows Vista Boot Up Process by Increasing Processor
There are many ways to decrease booting time and speed up start, such as using third party programs such as Startup Manager to manage programs running automatically. Windows 7 and Windows Vista users running dual-core, quad-core or other multi-core or multi-processors computer can try the following trick to make Windows boots faster.
Once enabled, Windows operating system will use all available (or selected number of) processor cores to run the boot up algorithms, and this potentially make the startup speedier and faster, with less waiting time on black screen and logon screen.
If your system has a Dual Core or a Quad Core CPU and you are using Windows Vista, you can speed up the boot process of Windows. A very simple tweak that allows your PC to boot faster then before.
But first you should figure out what’s the current boot up time of your system. For that purpose I’ve created a simple script in VB.
Here’s the script:
| Option Explicit On Error Resume Next Dim Wsh, Time1, Time2, Result, PathFile, MsgResult, MsgA, AppName, KeyA, KeyB, TimeDiff MsgA = “Warning! Close all running programs and click on OK.” KeyA = “HKEY_CURRENT_USER\Software\RestartTime\” KeyB = “HKEY_CURRENT_USER\Software\Microsoft\Windows\Curr e ntVersion\Run\RestartTime” AppName = “Boot Up Time” Set Wsh = CreateObject(“WScript.Shell”) PathFile = “””” & WScript.ScriptFullName & “””” Result = wsh.RegRead(KeyA & “Times”) if Result = “” then MsgResult = Msgbox (MsgA, vbOKCancel, AppName) If MsgResult = vbcancel then WScript.Quit Wsh.RegWrite KeyA & “Times”, left(Time,8), “REG_SZ” Wsh.RegWrite KeyB, PathFile, “REG_SZ” Wsh.Run “cmd /c Shutdown -r -t 00”, false, 0 else Wsh.RegDelete KeyA & “Times” Wsh.RegDelete KeyA Wsh.RegDelete KeyB TimeDiff = DateDiff(“s”,Result,left(Time,8)) MsgBox “Your system reboots in ” & TimeDiff & ” seconds”, VbInformation, AppName end if wscript.Quit |
Save the above in *.vbs file. & Execute it to know the time taken by your system to boot up, before applying the tweak.
A dialog box will appear giving you warning that the file you are about to run is an executable and it may contain viruses. Now clicking on Ok will reboot your system.
After the reboot you’ll see a dialog box which will be displaying the time taken by your system during reboot. Note this time.
To apply go to ‘msconfig‘
Click on Boot tab given in the upper side of the dialog box and click Advanced Options button. Here click the check box for Number of Processors. This will activate the drop down menu given just below it.

If you have a Dual Core CPU select 2 or if you have a Quad Core CPU select 4. Press OK and Apply. Windows will now ask for your confirmation for the changes that you’ve made in the boot settings. Click Yes and press Restart button in the following dialog box.
After coming back to windows you’ll have to restart your system again by clicking on that Vista Reboot.vbs file (like you did b4) becoz it will give us the time taken by the system to boot up.
When you get back to windows you’ll see the same dialog box displaying the time in seconds.
Compare it & U will find da difference.
Note: Please donot try if you are not an system expert. Doing so, unknowingly might Make your Processor malfunction permanently.
Code & Trick credit goes to CosmoCyber Admin.
~
Resize Partition under Windows 7
Resize Partition under Windows 7
Steps:
1. First click on Start and goto Control panel and type partition or hard drive.
2. Then a link would get open as Create and Format Hard Disk Partitions under administrative tools.Click on that link an disk management utility will get open for Windows 7.
3. Now right click on the volume and select the Shrink Volume. Over here you need to specify the amount of space which you want to shrink.
4. Now if you wan to extend any volume in Windows 7,then right click on the drive to be extended and select Extend Volume.
5. Now enter how much space do you wan to extend it.
~
Not a Single file
File created using MS OFFICE 2007 is not single file.

change the extension .docx to .rar or .zip of any file created using MS office 2007.
U get to see many folders in it. its not a single file.
They use XML to store data.
Note: Ur file should contain some data
~
